

Create a risk profile
Before Prefactor can give an agent’s runs a risk level, the account needs a risk profile to score them against. This guide creates one from a template and adjusts it to fit.
By the end you’ll have a saved profile on the Risk page, with the thresholds, data category values, and action multipliers you chose, ready to assign to agents.
Before you start
Section titled “Before you start”- Your admin user has the Full access role. A Read only user can open the form, but saving fails with an error.
- Have a rough idea of how strict the profile should be. The templates range from Permissive (development and testing) to Maximum Security (highly regulated work), and you can change any value afterwards.
Fill in the profile
Section titled “Fill in the profile”-
Go to Risk.
The Risk page opens, with a card for each profile the account already has.
-
Select Create profile at the top right.
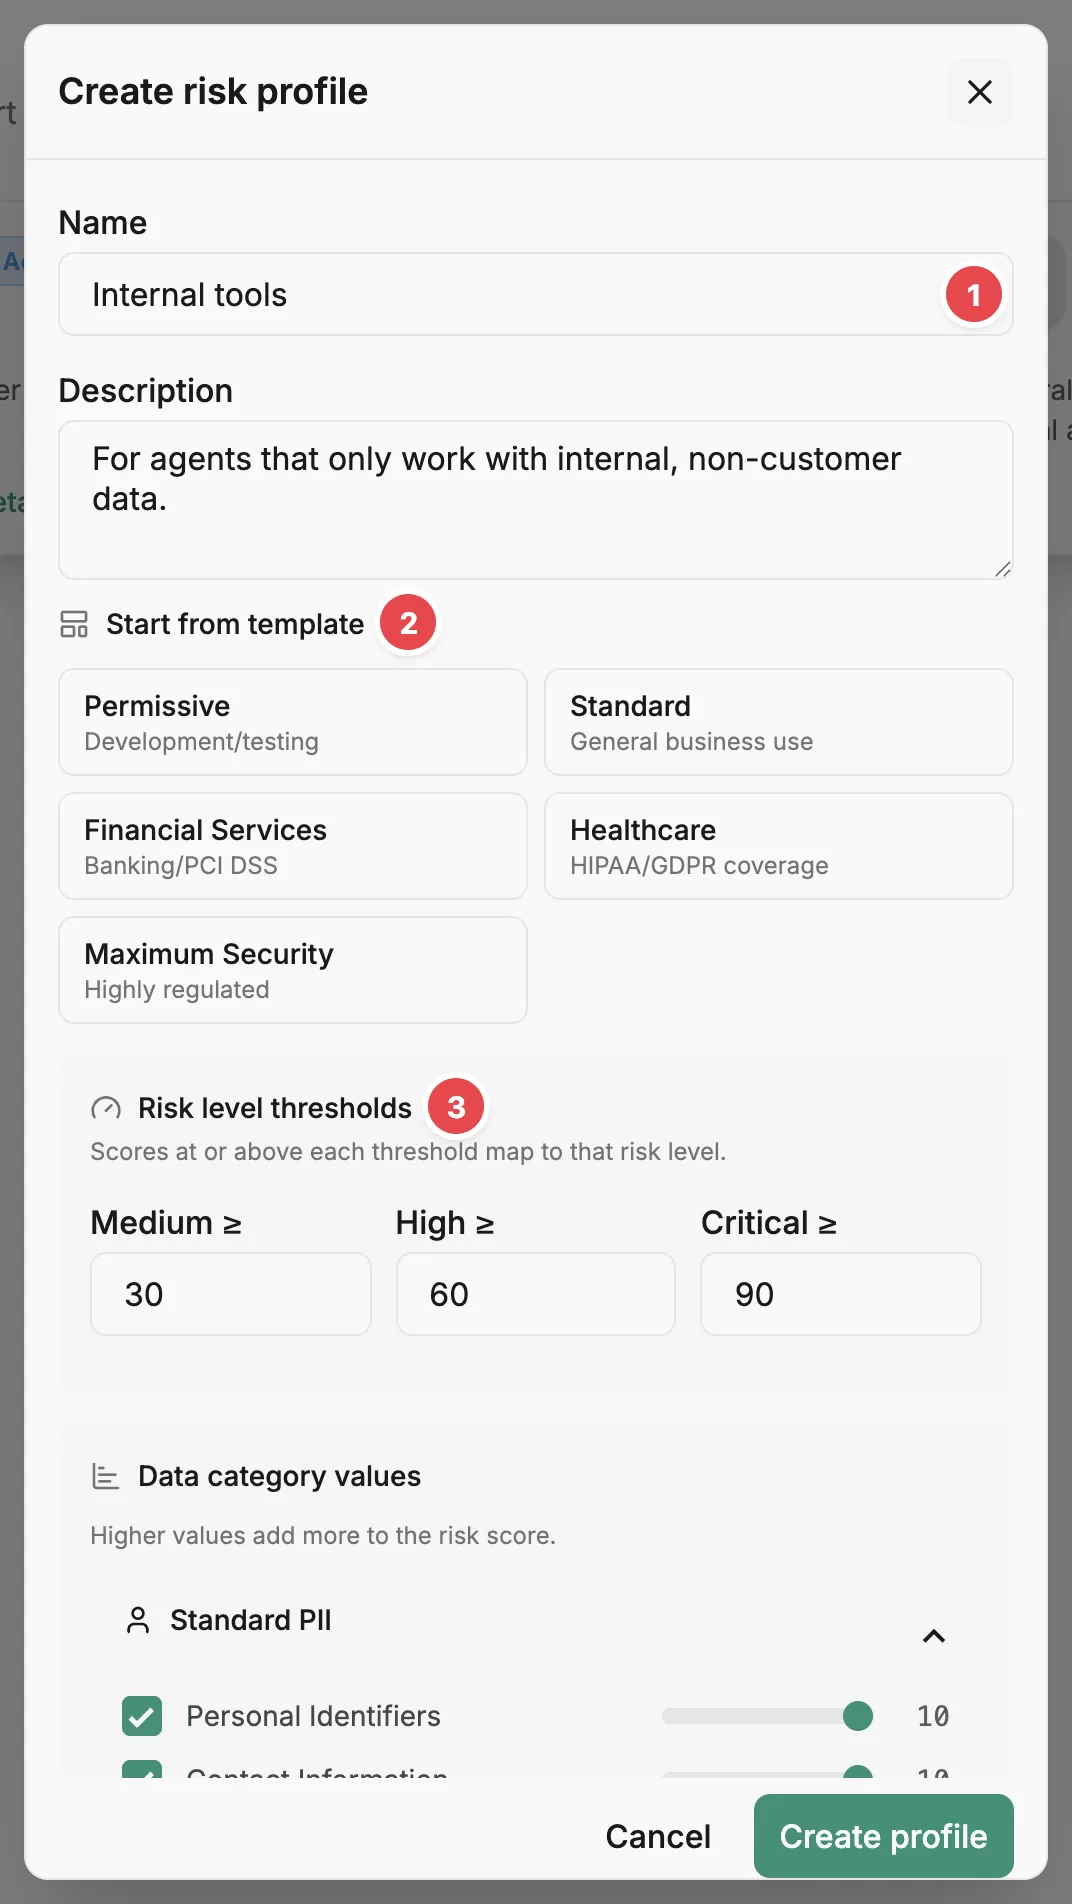
The Create risk profile dialog opens. You’ll work down it from Name 1, through Start from template 2, to Risk level thresholds 3 and the values below them.
-
Enter a Name and, optionally, a Description that says when the profile should be used.
You’ll pick the profile by name when you assign it to an agent, so make it specific: “Customer data, production” reads better in a dropdown than “Profile 2”.
-
Under Start from template, select the template closest to what you need: Permissive, Standard, Financial Services, Healthcare, or Maximum Security.
The template fills in the thresholds, data category values, and action multipliers below. Your name and description stay as you typed them. If you skip this step, the form starts with thresholds of 25, 50, and 75, every data category at 0, and action multipliers of 2.0 for Destroy Data, 1.5 for Financial Transactions and External Communication, and 1.0 for the rest. Every category and action starts included.
-
Under Risk level thresholds, check the values in Medium ≥, High ≥, and Critical ≥.
A run gets the highest level whose threshold its score reaches; anything below Medium ≥ is Low. Each value is a whole number from 1 to 999, and they must go up in order.
Tune what counts as risky
Section titled “Tune what counts as risky”-
Under Data category values, go through Standard PII, Sensitive data, and GDPR Article 9 Special Categories and set a value for each category.
Each slider runs from 0 to 10, and higher values add more to the score. Untick a category’s checkbox to leave it out of the profile. A ticked category at 0 stays inside the profile’s agreed scope but adds nothing to the score.
-
Optionally, open Action risk multipliers (advanced) and change how much each action amplifies the score.
Each multiplier runs from 1.0 to 5.0 in steps of 0.5. Untick an action to disallow it: an agent on this profile that declares that action is flagged as exceeding its agreed risk.
-
Select Create profile.
The dialog closes, Prefactor shows Risk profile created successfully, and the new profile’s card appears on the Risk page.
For how weights and multipliers combine into a score, see how risk is scored.
Verify
Section titled “Verify”Select the new profile’s card. Its page shows the Score thresholds you set, the agreed risk scope, the Category scores with a non-zero weight, and the Action multipliers. The list of agents using the profile stays empty until you assign it.
If it didn’t work
Section titled “If it didn’t work”- The dialog stays open with an error under a threshold. The thresholds aren’t in ascending order, or one is outside 1 to 999. Make medium lower than high and high lower than critical, then select Create profile again.
- Saving fails with a permission error. Your admin user is Read only. Ask someone with Full access to change your role on the Account › Admin users tab.
- Selecting a template leaves the values unchanged. Prefactor couldn’t load that template. Select it again, or set the values by hand.
- You want a different template after saving. Templates apply only when a profile is created. Use Edit on the profile’s page to change values, or create another profile from the other template.
Other ways to do this
Section titled “Other ways to do this”The API creates a profile with POST /api/v1/risk_profile. To start from a template, fetch its values with GET /api/v1/risk_profile/template and send them in the create request.
Related
Section titled “Related”- Risk profile — what a profile is and how its values turn into a risk level.
- Risk page — every field on the profile list and profile page, including editing and deleting a profile.
- Assign a risk profile — the next step: attach the profile to an agent.
- Risk — how Prefactor approaches agent risk.